
Press-on nails offer a convenient‚ salon-quality manicure at home‚ but proper sizing is crucial for comfort and a natural look․ This guide helps you measure accurately‚ choose the right sizes‚ and ensure a flawless fit‚ whether you’re a DIY enthusiast or a professional․ Learn how to avoid common mistakes and achieve a perfect‚ long-lasting press-on nail application with our comprehensive tips and size chart․
1․1 Understanding the Importance of Proper Fit
A proper fit is essential for press-on nails to ensure comfort‚ longevity‚ and a natural appearance․ Ill-fitting nails can lead to discomfort‚ lifting‚ or even damage to your natural nails․ A nail that is too small may pinch the nail bed‚ causing pain‚ while one that is too large can leave gaps‚ affecting the overall look․ Properly sized press-on nails distribute pressure evenly‚ preventing these issues․ They also stay in place longer‚ reducing the risk of premature removal․ Measuring accurately and selecting the right size ensures your press-on nails look flawless and feel comfortable all day․ This step is crucial for achieving a salon-quality finish without the hassle‚ making it worth the extra effort to get it right․

1․2 Brief Overview of Press-On Nails
Press-on nails are pre-glued‚ ready-to-wear artificial nails designed for quick‚ at-home application․ They come in various shapes‚ sizes‚ and designs‚ offering versatility for different preferences․ Unlike traditional acrylics or gels‚ press-on nails are easy to apply and remove‚ making them a popular choice for those seeking convenience without salon visits․ They are available in multiple sizes‚ typically numbered from 0 to 9‚ with each size corresponding to specific millimeter measurements․ This range ensures a fit for most nail beds‚ accommodating different widths and curvatures․ Press-on nails are reusable and can be customized to suit individual styles‚ making them a practical and fashionable beauty solution․ Their popularity has grown due to their ease of use‚ durability‚ and ability to achieve professional-looking results at home․
How to Measure Your Natural Nails
Measure your nails using a tape measure or ruler across the widest curvature․ Mark the edges‚ then lay the tape flat to determine the size in millimeters for a perfect fit․
2․1 Using a Tape Measure or Ruler
To measure your natural nails using a tape measure or ruler‚ start by identifying the widest part of your nail․ Place the tape measure or ruler across this area and mark the edges with a pen․ Carefully remove the tape and lay it flat on a ruler to measure the distance in millimeters․ This method ensures accuracy and helps determine the perfect size for your press-on nails․ Repeat for each finger‚ as sizes may vary․ For the most precise results‚ measure both hands‚ as nail sizes can differ․ Record the measurements to refer to when selecting press-on nails or creating a custom sizing template․ Accurate measurement is key to a comfortable and natural-looking fit․
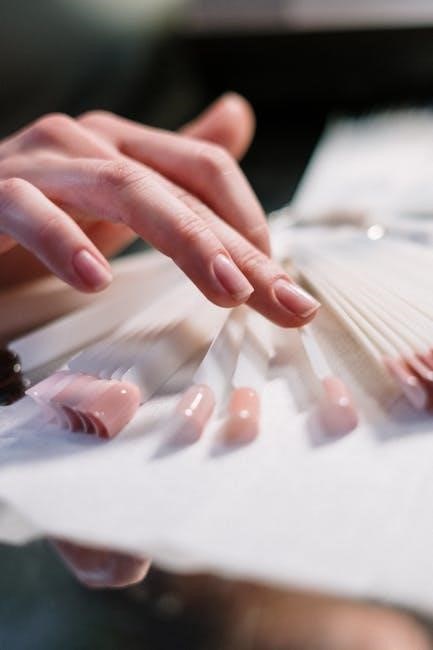
2․2 Using a Nail Sizing Kit
A nail sizing kit is a convenient tool for determining your press-on nail size․ These kits typically include multiple nail tips in various sizes‚ allowing you to try them on to find the best fit․ Start by selecting a tip that aligns with the width of your natural nail‚ ensuring it covers the entire nail bed without overlapping the cuticles․ Once you find the perfect size‚ note the number on the underside of the tip for future reference; This method is especially helpful for beginners‚ as it provides a hands-on way to identify your size․ Many kits also include a size chart to help you compare and record your measurements accurately․ Using a sizing kit ensures a precise fit and saves time during future applications․
2․3 Measuring the Widest Curvature of the Nail
To ensure a proper fit‚ it’s essential to measure the widest curvature of your natural nail․ This is typically found at the midpoint of the nail bed․ Using a flexible measuring tool or a strip of clear tape‚ gently press it across the nail at its widest point․ Mark the edges of the nail on the tape with a pen‚ then lay the tape flat on a ruler to measure the distance in millimeters․ This measurement will help you select a press-on nail that perfectly matches the width of your natural nail‚ ensuring a comfortable and seamless fit․ Accurate measurement at the widest curvature prevents gaps or tightness‚ making your press-on nails look more natural and last longer․

Press-On Nail Size Chart
A standard press-on nail size chart includes numbered sizes (0-9)‚ each corresponding to specific millimeter measurements․ It helps match your nail width to the perfect press-on size for a seamless fit․
3․1 Standard Nail Size Chart
A standard nail size chart typically ranges from size 0 to 9‚ with each size corresponding to specific millimeter measurements․ Size 0 is the largest‚ measuring around 18mm‚ while size 9 is the smallest at approximately 9mm․ The chart is designed to help users determine the best fit by comparing their natural nail width to the press-on nail sizes․ Most charts include a visual guide‚ showing the nail shape and width for each size‚ ensuring accuracy․ By using this chart‚ individuals can easily identify their size‚ whether they prefer shorter‚ medium‚ or longer nails․ This system simplifies the selection process‚ making it easier to achieve a comfortable and stylish press-on nail application․
3․2 How to Read the Size Chart
Reading a press-on nail size chart involves matching your natural nail measurements to the corresponding sizes․ Most charts list sizes numerically (0-9) or by millimeter width․ Start by measuring the widest part of your nail using a ruler or tape measure․ Compare this measurement to the chart‚ where size 0 is the largest (around 18mm) and size 9 is the smallest (about 9mm)․ Some charts also include visual guides‚ showing nail shapes and widths for easier reference․ When selecting sizes‚ consider the natural curve of your nail to ensure a snug fit․ If your measurement falls between two sizes‚ choose the larger one for comfort and proper coverage․ This method ensures a precise fit‚ enhancing both the appearance and longevity of your press-on nails․
3․3 Printable Size Chart Templates
Printable size chart templates are a convenient tool for measuring and selecting the right press-on nail sizes․ These templates‚ often available in PDF format‚ provide a visual guide with numbered sizes and millimeter measurements․ Simply print the template‚ place your nail over the corresponding size‚ and trace to determine the best fit․ Many templates include space to record measurements for each finger‚ ensuring consistency․ They are ideal for DIY enthusiasts and professionals alike‚ offering a quick and accurate way to size nails without guessing․ Some templates also include nail shape guides‚ helping you match your natural nail curvature․ By using a printable size chart‚ you can streamline the sizing process‚ save time‚ and achieve a precise fit for your press-on nails every time․
Tips for Choosing the Right Press-On Nail Size
Measure each nail individually‚ consider your nail shape‚ and choose the larger size if between sizes․ Use a buffer for a snug fit and note sizes for future applications․
4․1 Considering Nail Shape and Width
When selecting press-on nails‚ it’s essential to consider both your natural nail shape and width․ Oval and almond-shaped nails are the most versatile‚ while square or stiletto shapes may require more precise sizing․ Measure the widest part of your nail to ensure the press-on fits comfortably without overlapping or gapping․ If your nails vary in shape across your hands‚ choose sizes that complement each finger’s natural contour․ For instance‚ a narrower nail may suit a smaller size‚ while a wider nail benefits from a larger size․ This tailored approach ensures a natural look and prevents discomfort or lifting․ Always compare your measurements to the size chart for the best fit․
4․2 How to Select Sizes for Each Finger
Selecting the right size for each finger ensures a comfortable and natural fit․ Start by measuring each nail individually‚ as sizes can vary between fingers and even hands․ Use a tape measure or ruler to record the width of each nail at its widest point․ Transfer these measurements to a sizing chart to determine the corresponding press-on nail size․ If your nails fall between sizes‚ opt for the larger option to avoid a tight fit․ For accuracy‚ measure both hands‚ as they may differ slightly․ Consider using a nail sizing kit if available‚ which allows you to try on tips for the best fit․ Record your sizes for future reference to streamline the process․ This personalized approach ensures each finger has a press-on nail that looks and feels great․
4․3 Accounting for Nail Growth and Seasonal Changes
Nail growth and seasonal changes can affect the fit of your press-on nails․ Nails typically grow about 0․1 to 0․2 millimeters daily‚ so regular measurements are essential for a consistent fit․ During warmer months‚ natural nail growth may slow due to humidity‚ while colder weather can cause nails to become brittle․ To accommodate growth‚ consider selecting press-on nails slightly larger than your current size․ This ensures comfort as your nails grow․ Additionally‚ seasonal changes in temperature and humidity can alter nail shape and width‚ so remeasuring periodically is crucial․ For optimal results‚ maintain a variety of sizes to adapt to these changes‚ ensuring your press-on nails remain comfortable and secure throughout the year․
Common Mistakes to Avoid
Choosing a size too small can cause pinching‚ while too large may result in gaps․ Ignoring nail shape and curvature often leads to poor fit and lifting․

5․1 Choosing a Size That Is Too Small
Choosing a press-on nail size that is too small can lead to discomfort and damage․ A nail that is too narrow may pinch the nail bed‚ causing pain and potentially harming your natural nail․ This can also result in the press-on nail lifting prematurely‚ as it doesn’t have enough surface area to adhere properly․ To avoid this‚ always measure your nails accurately and refer to a size chart․ If you’re unsure‚ it’s better to opt for a slightly larger size for a comfortable and secure fit․ Proper sizing ensures your press-on nails look natural and last longer without causing harm to your nails․
5․2 Choosing a Size That Is Too Large
Choosing a press-on nail size that is too large can result in a poor fit and an unnatural appearance․ A nail that is too wide may not adhere properly‚ leading to gaps between the press-on nail and your natural nail․ This can cause the nail to lift or separate‚ reducing its longevity․ Additionally‚ an oversized nail may extend beyond your natural nail bed‚ making it prone to chipping or breaking․ To avoid this‚ ensure accurate measurements and refer to a size chart․ If a nail is slightly too large‚ consider filing it down to fit your natural shape better․ Proper sizing is key to achieving a seamless‚ professional-looking manicure that lasts․
5․3 Ignoring Nail Shape and Curvature
Ignoring your nail’s natural shape and curvature when selecting press-on nails can lead to a poor fit and an unnatural appearance․ Press-on nails come in various shapes‚ such as oval‚ square‚ and almond‚ and failing to match these to your natural nail shape can result in discomfort and a lack of adhesion․ Additionally‚ the curvature of your nail‚ particularly the widest part‚ plays a crucial role in ensuring the press-on nail sits properly․ If the curvature is too pronounced or flat for the chosen size‚ it may cause the nail to lift or separate prematurely․ Always consider both the width and shape of your natural nails when selecting press-on sizes to achieve a seamless‚ long-lasting application․
Customizing Your Press-On Nail Size
Customizing press-on nails involves filing‚ shaping‚ and buffering to achieve a perfect fit․ Use a nail buffer to smooth edges and create a seamless blend with your natural nail․
6․1 Filing and Shaping Press-On Nails
Filing and shaping press-on nails allows for a customized fit‚ ensuring comfort and a natural appearance․ Start by gently filing the press-on nail to match the curve of your natural nail bed․ Use a nail file or buffer to smooth out any rough edges or excess material․ Pay special attention to the sides and tips‚ as these areas often require adjustment for a seamless fit․ Shaping the nail to align with your natural nail’s width and curvature prevents gaps and ensures the press-on stays securely in place․ This step is especially important for nails that are slightly too large or misshapen․ By filing and shaping‚ you can achieve a flawless‚ personalized fit without damaging the press-on nail or your natural nail․
6․2 Using a Nail Buffer for Better Fit
A nail buffer is a versatile tool that enhances the fit of press-on nails by gently shaping and smoothing the surface of your natural nails․ Buffing removes ridges and rough spots‚ creating a more even base for the press-on nail to adhere to․ This step is especially useful for ensuring the press-on nail sits flush against the natural nail‚ preventing lifting or separation․ Use a buffer with multiple grits‚ starting with a coarser grit to shape the nail and finishing with a finer grit to polish․ Buffing also helps blend the edges of the press-on nail with your natural nail for a seamless look․ By buffing in one direction only‚ you avoid damaging the nail and achieve a professional-quality fit․ This simple step can make a significant difference in the comfort and longevity of your press-on nails․
6․3 Creating a Custom Sizing Template
Creating a custom sizing template is a practical way to ensure your press-on nails fit perfectly every time․ Start by tracing the outline of your natural nails on a piece of paper or using a digital tool․ Mark the widest curvature of each nail to determine the ideal size․ Use millimeter measurements for accuracy‚ as most press-on nails are sized accordingly․ Compare your tracing with a standard size chart to identify the best fit․ For added precision‚ label each template by finger and hand‚ as sizes can vary․ This method allows you to visualize the fit before application and makes future purchases easier․ By creating a custom template‚ you can avoid common sizing errors and achieve a seamless‚ professional-looking manicure at home․

Troubleshooting Fit Issues
Addressing fit issues ensures long-lasting wear and comfort․ Gaps‚ lifting‚ or tight fits can be resolved by filing‚ buffering‚ or adjusting the nail tip for a seamless application․
7․1 Dealing with Gaps Between Nail and Tip
Gaps between your natural nail and the press-on tip can lead to a less-than-flawless look․ To fix this‚ gently file the sides of the press-on nail using a nail buffer to create a snug fit․ If the gap persists‚ apply a small amount of nail glue to the back of the tip and press it firmly onto your nail‚ holding for a few seconds․ For larger gaps‚ consider sizing up or using a nail shape that better matches your natural curve․ Properly fitting press-on nails ensure a seamless appearance and prevent lifting or separation over time․ Always test the fit before applying glue for the best results․
7․2 Addressing Lifting or Separation
Lifting or separation of press-on nails can occur due to improper sizing‚ insufficient adhesion‚ or natural nail growth․ To fix this‚ gently buff the area where the nail is lifting to create a better surface for bonding․ Apply a small amount of nail glue to the affected area and press the nail firmly onto your natural nail‚ holding for a few seconds․ For recurring issues‚ ensure your natural nail is clean and dry before application․ If the problem persists‚ consider resizing or reshaping the press-on nail to match your natural curve more closely․ Proper preparation and sizing are key to preventing lifting and ensuring a long-lasting‚ seamless fit․
7;3 Fixing a Too-Tight Fit
If your press-on nail feels too tight‚ it may cause discomfort or even damage to your natural nail․ To fix this‚ gently file the sides of the press-on nail using a nail buffer to reduce its width slightly․ Avoid filing too much‚ as this could weaken the nail․ If the tightness persists‚ consider resizing the nail by selecting a slightly larger size next time․ Proper fit is essential for both comfort and a natural appearance․ Ensure your natural nail is clean and dry before application to prevent lifting or separation․ By addressing the tight fit promptly‚ you can enjoy a comfortable and long-lasting press-on nail experience without compromising the health of your natural nails․

Frequently Asked Questions
- What if my nails are different sizes on each hand?
- How do I know if I’m between sizes?
- Can I reuse press-on nails?
8․1 What If My Nails Are Different Sizes on Each Hand?
If your nails vary in size between hands‚ measure each finger individually to ensure the best fit․ Press-on nail sets often include multiple sizes‚ allowing you to select the most suitable for each finger․ For instance‚ your dominant hand might have slightly larger nails due to frequent use․ When in doubt‚ choose the larger size to avoid pinching or discomfort․ Additionally‚ using a nail buffer can help refine the fit by gently shaping the press-on nail to your natural nail bed․ This approach ensures comfort and a natural appearance‚ even if your nails differ in size․ Always measure both hands to achieve the most accurate and comfortable fit for your press-on nails․
8․2 How Do I Know If I’m Between Sizes?
If your nail measurement falls between two sizes‚ it’s best to opt for the larger size to ensure comfort and proper coverage․ A smaller size might cause pinching or discomfort‚ while a larger size can be adjusted using a nail buffer to file down the sides for a better fit․ Press-on nails are designed to be versatile‚ so slight adjustments can make a significant difference․ Additionally‚ many press-on nail sets include multiple sizes‚ allowing you to mix and match for the perfect fit․ If you’re still unsure‚ consider using a sizing kit or referring to a printable size chart to determine the most accurate size for your nails․ This ensures a comfortable and natural-looking application every time․
8․3 Can I Reuse Press-On Nails?
Yes‚ press-on nails can be reused if properly cared for․ To reuse them‚ gently remove the nails with a nail glue remover or acetone‚ taking care not to damage the nail or the press-on tip․ Clean the press-on nails with alcohol to remove any residue․ Store them in a protective case to maintain their shape and condition․ Reusing press-on nails can save money and reduce waste‚ but ensure they are in good condition before reapplying․ Avoid using damaged or worn-out press-on nails‚ as they may not adhere well or could cause discomfort․ Proper care and storage are key to extending the life of your press-on nails for future use․
Mastering the press-on nail size guide ensures a perfect‚ comfortable fit․ Proper measurement and customization lead to stunning‚ long-lasting results․ Embrace the future of nail beauty with confidence and style․
9․1 Final Tips for a Perfect Fit
For a flawless press-on nail application‚ always measure both hands‚ as nail sizes may differ․ If your nails fall between sizes‚ opt for the larger option to ensure comfort and full coverage․ Use a nail buffer to gently shape and smooth your natural nails‚ creating a better surface for the press-ons to adhere to․ Keep track of the sizes that work best for you by noting the numbers on the underside of the nails․ This saves time for future applications and ensures consistency․ Remember‚ a proper fit prevents discomfort and extends wear․ By following these tips‚ you’ll achieve a natural‚ salon-quality look that lasts‚ making press-on nails a convenient and stylish choice for any occasion․
9․2 The Future of Press-On Nail Sizing
The future of press-on nail sizing is poised for innovation‚ with technology playing a key role in enhancing customization and fit․ Advances in 3D printing and augmented reality (AR) could allow for bespoke nail sets tailored to individual nail shapes and sizes․ Eco-friendly materials and sustainable practices are also expected to shape the industry‚ offering consumers more ethical options․ Additionally‚ AR try-on features could revolutionize the way people shop for press-on nails‚ enabling virtual size testing and reducing returns․ As personalization becomes a priority‚ brands may adopt AI-driven sizing tools to recommend the perfect fit based on user measurements․ These advancements promise to make press-on nails more accessible‚ customizable‚ and environmentally conscious‚ catering to a diverse range of preferences and needs․